创建第一个QtWidgets程序
import sys
from PySide6.QtWidgets import QApplication, QLabel

app = QApplication(sys.argv)  #创建一个 QApplication 实例
label = QLabel("Hello World!")
label.show()
app.exec_()
要用 PySide6 创建一个窗口程序,你必须先从 PySide6.QtWidgets 模块中引用需要使用的类。
引用后,创建一个 QApplication 实例。
因为 Qt 可以从命令行接收参数,你可以向 QApplication 对象传递任意参数。一般情况下我们不需要传递参数,或者也可以像下面这样写:
app = QApplication([])创建完 QApplication 对象后,我们还创建了 QLabel 对象。QLabel 是一个可以显示文本和图像的容器。文本可以是简单文本,也可以是富文本,像HTML一样。
# This HTML approach will be valid too!
label = QLabel("<font color=red size=40>Hello World!</font>")
注意
在创建完一个标签后,我们要对它调用 show() 函数。
最后,我们调用 app.exec_() 进入主循环,开始执行代码。事实上,只有执行到了这,标签才被显示,但是现在我们可以先忽略这点。
创建一个简单按钮
如何用 Qt for Python 处理信号和槽。信号和槽是Qt的一个特色,用来让你的图形组件与其他图形组件或 Python 代码交流。
首先,引用所需的 PySide6 类和 sys 模块:
import sys
from PySide6.QtWidgets import QApplication, QPushButton
from PySide6.QtCore import Slot
然后创建一个函数,用来输出信息到控制台:
# Greetings
@Slot()
def say_hello():
    print("Button clicked, Hello!")
注意
@Slot() 是一个装饰器,用来将一个函数定义为槽函数。现在可以先不理解它,但是还是需要这么写来防止意外错误。
需要创建 QApplication 来运行你的代码,创建一个 QPushButton 实例,它是一个可点击的按钮。在创建时传入的字符串会显示在按钮上:
# Create the Qt Application
app = QApplication(sys.argv)
# Create a button
button = QPushButton("Click me")
在显示按钮之前,我们需要将按钮与之前定义的 say_hello() 函数连接。有新老两种方法来建立连接,我们这里就演示新的方法。QPushButton 预定义了一个叫 clicked 的信号,每当按钮被按下就会触发该信号。我们要把这个信号和 say_hello() 函数连接:
# Connect the button to the function
button.clicked.connect(say_hello)
最后,我们显示这个按钮,并进入主循环:
# Show the button
button.show()
# Run the main Qt loop
app.exec_()
完整代码:
#!/usr/bin/python

import sys
from PySide6.QtWidgets import QApplication, QPushButton
from PySide6.QtCore import Slot

@Slot()
def say_hello():
 print("Button clicked, Hello!")

# Create the Qt Application
app = QApplication(sys.argv)
# Create a button, connect it and show it
button = QPushButton("Click me")
button.clicked.connect(say_hello)
button.show()
# Run the main Qt loop
app.exec_()
创建带输入框和按钮的对话框程序
如何用 QDialog 创建一个简单的对话框程序。这个程序可以让用户在 QLineEdit 组件中填入自己的名字,然后当点击 QPushButton 组件时程序会跟你打招呼
从创建一个对话框窗口的代码开始
import sys
from PySide6.QtWidgets import QApplication, QDialog, QLineEdit, QPushButton

class Form(QDialog):

    def __init__(self, parent=None):
        super(Form, self).__init__(parent)
        self.setWindowTitle("My Form")


if __name__ == '__main__':
    # 创建Qt应用程序
    app = QApplication(sys.argv)
    # 创建并显示Form
    form = Form()
    form.show()
    # 运行Qt主循环
    sys.exit(app.exec_())
我们对引用模块、创建 QApplication 和执行 Qt 主循环都不陌生。这里唯一要新学的是类的定义。
super(Form, self).__init__(parent)表示调用父类 QDialog 的构造函数来初始化对话框。super()函数用于调用父类的方法,这里通过super(Form, self)来调用 QDialog 类的构造函数。parent参数表示对话框的父级窗口,如果没有指定,默认为 None。self.setWindowTitle("My Form")设置对话框的标题为 “My Form”,即对话框的窗口标题栏上显示的文字。
可以在此基础上继续添加其他界面元素和逻辑,以构建出符合你需求的对话框。
我们可以任意创建 PySide6 中组件的子类。在上面的程序中,我们定义了一个 QDialog 的子类,并将它命名为 Form。我们还执行了 init() 方法,它可以调用父组件 QDialog 的初始化方法。另外,setWindowTitle() 方法可以设置对话窗口的标题。在 main() 函数里,我们创建了一个 Form 对象并让它显示出来
创建组件
接下来,我们需要创建两个组件:一个 QLineEdit,用来让用户填写他的名字;一个 QPushButton,用来输出 QLineEdit 中的内容。所以,在 Form 的 init() 方法中加入下面两行代码:
# 创建组件
self.edit = QLineEdit("Write my name here..")
self.button = QPushButton("Show Greetings")
#显而易见,这两个组件会显示对应的文字。
创建布局以排列组件
Qt 中的布局支持可以帮助你排列程序中的组件。在这个例程中,我们用 QVBoxLayout 来对这两个组件进行垂直布局。在 init() 方法中创建组件的代码后加入下面的代码:
# 创建布局并添加组件
layout = QVBoxLayout(self)
layout.addWidget(self.edit)
layout.addWidget(self.button)
我们创建了布局,并使用 addWidget() 方法在布局里添加了组件。
创建函数并连接按钮
最后一步,在 Form 类中创建一个函数,并且将它和按钮连接。我们想要我们的函数成为 Form 类的一部分,所以把它加在 init() 函数之后:
# 向用户打招呼
def greetings(self):
    print(f"Hello {self.edit.text()}")
这个函数用来在控制台中输出 QLineEdit 中填入的内容。我们使用 QLineEdit.text() 方法获取文本。
然后只需要将 QPushButton 和 Form.greetings() 方法 连接 即可。在 init() 方法中加入下面这行代码:
# 连接greetings槽和按钮单击信号
self.button.clicked.connect(self.greetings)
尝试运行,你可以在 QLineEdit 中输入你的名字,然后看命令行向你打招呼。
完整代码
import sys
from PySide6.QtWidgets import (QLineEdit, QPushButton, QApplication,
    QVBoxLayout, QDialog)

class Form(QDialog):

    def __init__(self, parent=None):
        super(Form, self).__init__(parent) #parent指定对话框的父窗口
        # 创建组件
        self.edit = QLineEdit("Write my name here")
        self.button = QPushButton("Show Greetings")
        # 创建布局并添加组件
        layout = QVBoxLayout()
        layout.addWidget(self.edit)
        layout.addWidget(self.button)
        # 应用布局
        self.setLayout(layout)
        # 连接greetings槽和按钮单击信号
        self.button.clicked.connect(self.greetings)

    # 向用户打招呼
    def greetings(self):
        print(f"Hello {self.edit.text()}")

if __name__ == '__main__':
    # 创建Qt应用程序
    app = QApplication(sys.argv)
    # 创建并显示Form
    form = Form()
    form.show()
    # 运行Qt主循环
    sys.exit(app.exec_())
使用QTableWidget组件显示数据
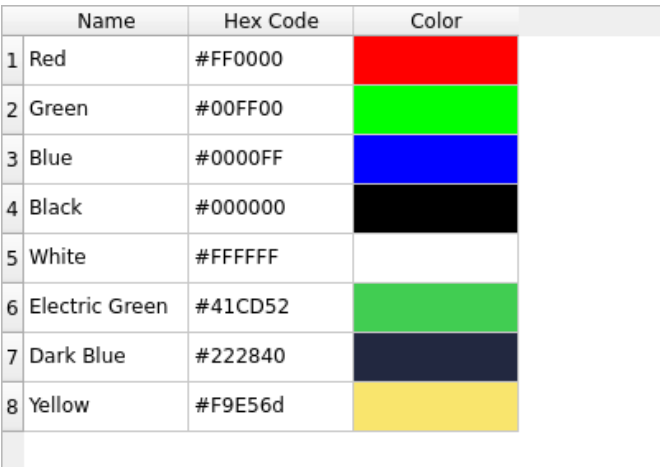
想要在表格里显示数据,可以直接使用 QTableWidget 组件来完成。本节教程将完成一个显示颜色列表的程序。
注意,使用 QTableWidget 不是在表格中显示信息的唯一方法。你也可以创建数据列表并用 QTableView 将其显示出来。
引用 QTableWidget,QTableWidgetItem 和 QColor 来显示背景颜色
import sys
from PySide6.QtGui import QColor
from PySide6.QtWidgets import (QApplication, QTableWidget,
                               QTableWidgetItem)
创建列表来存储各种颜色对应的十六进制码
colors = [("Red", "#FF0000"),
          ("Green", "#00FF00"),
          ("Blue", "#0000FF"),
          ("Black", "#000000"),
          ("White", "#FFFFFF"),
          ("Electric Green", "#41CD52"),
          ("Dark Blue", "#222840"),
          ("Yellow", "#F9E56d")]
定义用来将十六进制码转换为RGB值的函数
def get_rgb_from_hex(code):
    code_hex = code.replace("#", "")
    rgb = tuple(int(code_hex[i:i+2], 16) for i in (0, 2, 4))
    return QColor.fromRgb(rgb[0], rgb[1], rgb[2])
初始化 QApplication 对象
app = QApplication()循环列表,创建 QTableWidgetItems 对象,并按照 x, y 坐标将其加入表格
for i, (name, code) in enumerate(colors):
    item_name = QTableWidgetItem(name)
    item_code = QTableWidgetItem(code)
    item_color = QTableWidgetItem()
    item_color.setBackground(get_rgb_from_hex(code))
    table.setItem(i, 0, item_name)
    table.setItem(i, 1, item_code)
    table.setItem(i, 2, item_color)
显示表格并运行 QApplication 循环
table.show()
sys.exit(app.exec_())
最终运行效果


